How to Embed a Video in PowerPoint that Actually Plays
August 6, 2025

Photo by Paul Hanaoka on Unsplash
Embedding videos in PowerPoint can transform your presentations. It adds a dynamic element that captures attention, but many struggle with getting videos to play smoothly.
This guide will help you embed videos that actually work. Whether from your computer or YouTube, we’ve got you covered.
We’ll walk you through each step, ensuring your videos enhance your slides. You’ll learn about video formats and compatibility.
We’ll also cover editing and formatting options. Troubleshooting tips will help you avoid common pitfalls.
By the end, you’ll be confident in using videos effectively. Your presentations will be more engaging and professional.
Let’s dive into the world of video embedding in PowerPoint.
Why Embed Videos in PowerPoint?
Before we dive into how to embed a video in PowerPoint, it’s worth understanding the why:
- Boosts engagement: Presentations with embedded videos are more likely to keep your audience’s attention.
- Explains visually: Video can help explain complex ideas, showcase products, or provide testimonials.
- Adds professional polish: A well-placed video adds sophistication and multimedia variety to your presentation.
But it only works if the video plays. Let’s make sure it does.
Understanding Video Formats and Compatibility
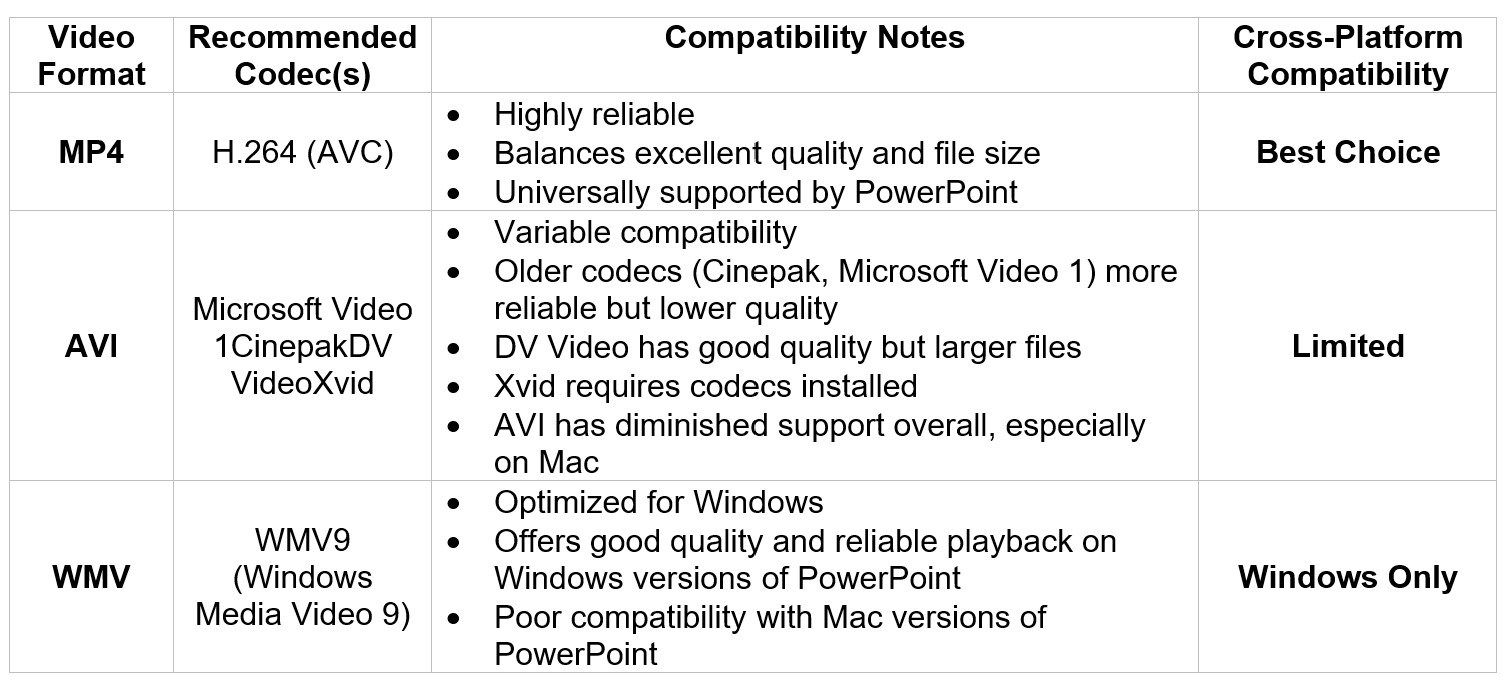
Choosing the correct video format is crucial for seamless playback in PowerPoint. Different formats can impact the compatibility with your version of PowerPoint. Knowing which formats work is essential.
PowerPoint supports various video formats. Here are some common ones:
- MP4
- AVI
- WMV
But video format alone is only part of the equation. The codec the format uses is also important. The table below helps explain the formats and the best codecs for use to ensure alignment with PowerPoint to prevent issues. Compatible formats improve the presentation flow, ensuring smooth video playback during presentations.
How to Embed a Video in PowerPoint from Your Device
Method 1: Using the Slide Placeholder
If your slide has a video placeholder, embedding is easy.
- 1. Click the Insert Video icon (a filmstrip symbol) inside the placeholder.
- 2. A window will open prompting you to browse your files.
- 3. Choose your video file and click Insert.
- 4. The video will appear on your slide. You can then resize, drag, or reposition it.
This is the fastest way to embed a video stored locally on your device.
Method 2: Using the Insert Tab
If there’s no placeholder, follow these steps:
- Go to the Insert tab on the ribbon.
- Click Video in the Media group.
- Choose This Device from the dropdown menu.
- Browse to the video you want to add and click Insert.
This approach gives you flexibility to add videos to any slide, regardless of layout.
How to Embed a YouTube Video in PowerPoint
YouTube is one of the most popular platforms for sharing and discovering video content. If your video is hosted on YouTube, or you want to enhance your slide with relevant third-party content, PowerPoint makes it easy.
Step-by-Step: Embedding a YouTube Video
- Go to the Insert tab.
- Click Video and select Online Videos from the dropdown.
- Paste the full YouTube URL into the address field.
- Click Insert.
The YouTube video will appear on your slide as an embedded player.
Important Notes for YouTube Embeds:
- Internet Required: Unlike local videos, YouTube embeds need an internet connection during playback.
- Licensing Matters: Ensure you have the right to use any third-party YouTube video, especially in professional or commercial settings.
- No Download Needed: Embedding links directly avoids the need to download or convert files.
This is a great option for sharing public videos such as tutorials, testimonials, or product walkthroughs. However, if you're presenting offline or need consistent playback across different environments, opt for uploading and embedding a local video file instead.
How to Link to an Online Video Instead of Embedding
Linking to an online video instead of embedding keeps your presentation file smaller. This approach is ideal if file size is a concern. It also ensures you always access the latest version of the video.
To link a video:
- Select the slide where you'd like to add a hyperlink.
- Highlight the text or object you want to use as the link object.
- Go to the Insert tab and select Hyperlink.
- Paste the video URL in the address field and confirm. This will create a clickable link that opens the video in your browser. Always verify that the link works before presenting.
Setting Playback Options (Auto, On Click, Loop)
Configuring playback settings ensures your video runs exactly when and how you want it to.
To access playback controls:
- Select your video.
- Go to the Playback tab in the ribbon. Playback options are found in the Video Options section:
Start Options:
- In Click Sequence – Plays when you click during the presentation.
- Automatically – Starts when the slide appears.
- When Clicked On – Begins when you manually click the video.
Looping and Rewind:
- Enable Loop Until Stopped for repeating videos.
- Use Rewind After Playing to reset the video after it ends.
Full-Screen Playback:
- Check the box for Play Full Screen to eliminate distractions and enhance visibility.
These settings allow you to deliver smooth, uninterrupted presentations without needing to fumble with playback.
Editing and Formatting Embedded Videos
Once functionality is set, improve the look of your video with design tools:
Trimming, Cropping, and Adding Effects
You don’t need a separate video editor for these tasks, PowerPoint has built-in tools:
Trimming a Video
- Select the video.
- Go to Playback tab and click the Trim Video button.
- Drag the green start and red end sliders to the desired range. Or, manually enter the desired start and end times in the available boxes.
- Click OK.
Cropping the Video Frame
- Select the video.
- Go to the Video Format tab and click the Crop button.
- The video will appear with black hash marks on the perimeter. Drag these to adjust the visible area.
- Press Enter when finished.
Applying Effects
- Select the video.
- Go to the Video Format tab and click the Video Effects drop down menu.
- Choose from shadows, glows, 3D rotation, and more.
Adjust Options
- Select the video
- Go to the Video Format tab.
- In the Adjust section, use the following options as needed:
- Corrections: Brightness/Contrast settings optimize visibility
- Color: Offers recoloring to help match brand colors or themes
- Poster Frame: Let’s you add borders to individual frames of the video. Here’s how:
- Pause on a desired frame, then select Poster Frame > Current Frame.
- Or choose Poster Frame > Image from File to upload your own thumbnail.
Video Styles
- Select the video.
- Go to the Video Format tab.
- In the video styles section, click the drop down arrow next to the style gallery to view all options for adding polished borders, drop shadows, and visual frames.
These enhancements can improve clarity, match your theme, and add polish to your slide design.
Accessibility Considerations
Making your presentations accessible is crucial for inclusivity and professional polish. When embedding videos, always consider accessibility features:
Add Captions or Subtitles:
Ensure your videos have embedded captions or subtitles. If unavailable, consider using PowerPoint’s built-in captioning tools or third-party caption generators. Captions help attendees with hearing impairments or those viewing without sound.
Audio Descriptions:
If your video content includes essential visuals not covered by the spoken dialogue, consider including an audio description or additional narration within your presentation.
By prioritizing accessibility, you demonstrate professionalism and inclusivity in your presentations.
Preparing for Offline Presentations
When internet connectivity isn’t guaranteed, embedding videos stored locally on your device is essential. Online videos require active streaming, posing risks during offline presentations. To prepare effectively, make sure to do the following:
Download and Embed Locally
Always embed local copies of videos directly into your slides instead of relying on online sources. Make sure the videos are stored locally on your computer instead of in the cloud if you will not have Internet access.
Test Offline Playback
Before presenting, switch your device to airplane mode or disconnect from the internet, and test playback in Slide Show mode to ensure your videos run smoothly without connectivity.
Taking these proactive steps will ensure a stress-free and professional presentation experience, regardless of the environment.
Troubleshooting: When Your Video Won’t Play
Encountering playback issues is common but manageable with some troubleshooting.
Here are some potential problems and their solutions:
- Unsupported Format: Convert the video to MP4 with the H.264 codec.
- Broken Links: Relocate missing files and update the links accordingly.
- Outdated Software: Update PowerPoint and drivers.
- Video Not Playing: Check you are connected to the Internet and/or check to ensure the video path hasn’t been altered or moved since the initial setup.
Tips for Smooth Video Playback in Presentations
Want to avoid lag, audio sync issues, or compatibility errors? Follow these tips:
Optimize Media Compatibility
- Go to the File tab.
- Click Info.
- Click Optimize Media Compatibility. PowerPoint will scan your media and recommend updates for cross-device compatibility.
Note: The Optimize media compatibility feature is context sensitive; therefore, it will only show up under certain conditions. It will not show up if:
- No embedded media is detected
- Media is already optimized
- Working on a Mac – feature isn’t available for Mac users
- PowerPoint 365 is outdated or running without recent updates
Compress Video Files
- Go to the File tab.
- Click Info.
- Select Compress Media and choose the desired compression setting from the menu. This feature helps reduce file size without major quality loss, ideal for large decks or online sharing.
NOTE: This feature is not available in the Mac version of PowerPoint
Test in Presenter Mode
It is best practice to always test videos in Slide Show View before presenting. Additionally, if you're using a different computer, test it there too. To access presenter mode for testing:
- Go to the Slide Show tab.
- In the Monitors section, select Use Presenter View.
- Click the From Beginning button to begin the test.
- Press ESC to leave the slide show view once you are sure the test was successful.
Prefer Local Files When Offline
If you won’t have internet access, always embed videos from your local device, not online links. Be aware, this will dramatically increase the size of your file and may affect playback, especially if presenting via an online meeting room.
Best Practices for Using Video in PowerPoint
Effectively using videos in PowerPoint demands strategic planning. Videos should complement your narrative and not distract. Aim for seamless integration in your slides.
Consider these best practices to enhance your presentation:
- Quality: Use high-resolution videos.
- Relevance: Ensure the video supports your topic.
- Length: Keep videos concise.
These tips will keep your audience engaged without overwhelming them. Prioritize clarity and professionalism to leave a lasting impression.
Final Thoughts
Knowing how to embed a video in PowerPoint (and do it well) can dramatically improve the impact of your presentations. Whether you’re training a team, pitching a product, or leading a workshop, embedded video can help your message land with clarity and confidence.
Just remember:
- Use the right insert method.
- Choose playback settings based on your audience.
- Trim and format your video for professionalism.
- Test everything ahead of time.
Learn More with Intellezy
Want to see all these features in action? Watch a PowerPoint tutorial from our Microsoft 365 PowerPoint Intermediate course that includes real walkthroughs of:
- Embedding local and online videos
- Customizing playback and formatting
- Using advanced design and editing tools
Explore all of our PowerPoint training, plus hundreds of additional courses, by starting your free trial of Intellezy’s training video library today. Gain hands-on expertise and start building your or your team’s professional skill set.
Request Your Free Trial
Explore our complete library to see how you can maximize your team’s efficiency, performance, and productivity.
Submitting...
Topics & Tags:
Related Articles
-
No Tag
Skills Gap Analysis: How to Identify and Close Skill Gaps
-
No Tag
Training Delivery Methods That Improve Learning Results
-
No Tag
Personalized vs. Individualized Learning
-
No Tag
Benefits of Blended Learning in Corporate Training
-
No Tag
Virtual Leadership Training: How to Develop Managers for Remote and Hybrid Teams
-
No Tag
What Is Simulation Training? Benefits, Types, and Use Cases
-
No Tag
The Soft Skills Gap Holding Your IT Team Back
-
No Tag
How to Manage a Diverse Team: Strategies for Inclusive Leaders


